Guidelines for Filmers
For Signs2Go, we filmed in a studio. We used a Chromakey background (blue or green), so that we could ‘key out’ the background and super-impose the signers on the website.
Camera
As a minimum: Use a good quality DV-camera mounted on a tripod.
You can do the recordings on tape or directly on hard disk or memory cards.
To make video recordings with Chromakey you need a good camera:
| Not recommended | Might just do | OK | Good |
| HDV, DVD, highly compressed formats | DV | DVCPRO50 |
DVCPROHD 720P |
Chromakey background
The most flexible way is to use a ChromaKey studio. Then you use a special blue or green background and change the background electronically in the editing process.
For more information about Chromakey, see:
Lights
If possible try to set up a standard Three-Point Lighting:
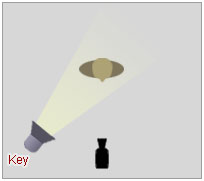 |
Key Light This is the main light. It is usually the strongest and has the most influence on the look of the scene. It is placed to one side of the camera/subject so that this side is well lit and the other side has some shadow. |
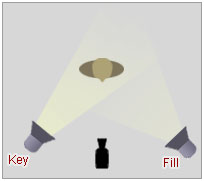 |
Fill Light
|
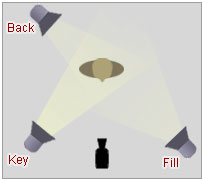 |
Back Light The back light is placed behind the subject and lights it from the rear. Rather than providing direct lighting (like the key and fill), its purpose is to provide definition and subtle highlights around the subject's outlines. This helps separate the subject from the background and provide a three-dimensional look. More info: http://www.3drender.com/light/3point.html |
In addition you can have separate lighting of the background. Make sure that the actor doesn't throw any shadows on the background. If this is a problem, try to increase the distance between the actor and the background.
Try to keep the lighting the same for all your recordings (make a drawing of the placement of lights, camera and actor so that you can make new recordings with the same setup).
Lighting for Chromakey
Effective keying relies on good lighting. It is essential to minimize variation in colours for the backdrop, meaning that you must evenly light the background to avoid hot spots. Additionally, you’ll want well-lit subjects that don’t cast shadows on the backdrop. This might sound a bit challenging, so here are a few tips on doing it right:
-
Spill is bad. Your backdrop must be evenly lit. You’ll also want to place the foreground person or object far enough away from the backdrop (with their own lighting) to avoid spill. When subjects stand too close to the backdrop, the colour can spill into lighter areas of their hair or clothing, which causes keying problems. Additionally, if the foreground and background are too close, you’ll get shadows on the backdrop.
-
Get rid of hot spots. Avoid variation in brightness for the backdrop so you can get a better chroma key. To do this, look for hot spots. Simply turn down the exposure of your camera and look through the viewfinder. Your hot spots will be quite visible. Adjust your lighting by softening it, and then set your exposure back to a normal level.
-
Light with softboxes or fluorescent lights. The use of these specialty light types will better enable you to get an evenly lit backdrop. The goal is to spread an even amount of light across the surface of the backdrop.
-
Match the foreground to the background. If possible, you should know what your keyed footage will be composited with so you can adjust lighting. The most believable keys try to match the lighting of the replacement background in the final composite. Make sure that the light is shining from the same direction (and with the same colour and intensity) as the light shining on the background plate you plan to use.
-
Keep your subject and your camera as far away from the screen as possible. It is better to increase the shooting distance.
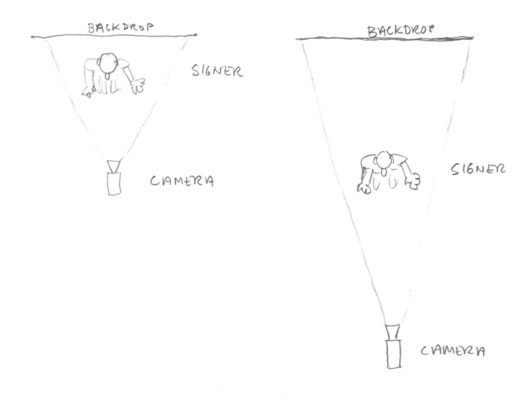
If you use a setup like the one on the left, the colour from the backdrop will reflect and spill on the sides of the signer (green or blue tint on the sides of the face and body).
Increase both the distance from the backdrop to the signer and the distance from the camera to the signer as much as possible (as shown on the right).
This setup will give several advantages:
- Less spill of blue/green on the signer
- Possible to have separate lighting of the signer and the backdrop
- Less shadows from the signer on the backdrop
- Less image distortion of the signer (due to more use of zoom on the camera)
- Backdrop more out of focus and easier to key out
Signer
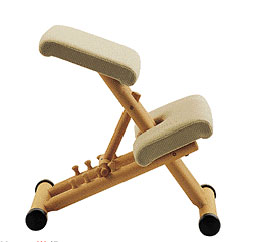
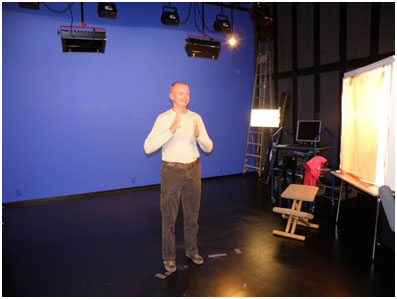
The signer should be a native signer, with nice appeal and good "contact" with the camera. The signer could be standing or sitting (no "laid-back" sitting please). If you use a chair – make sure that it is not visible in the frame. We often use this kind of chair for the signer in the studio:
Location of the signer
The distance from signer – background has to be at least 2 meters. More is better. There cannot be any shadows from the signer (or from anything else) on the background.
Shadow on the background: not good!
Mark the location of the signer on the floor, so that each time, you can use the same position.
The signer is standing or the signer can use a special chair.
NB Localisation. When referring to things on screen, the signer needs to know where things will be located on the screen! Signer points to the right, then something must be left on the screen.
Frame
“Frame” is the term that is used, to indicate what you will see, in the video.
Keep the top of the actors head close to the top of the frame, and the belt/navel at the bottom of the frame (or below);-)
For sign language, the face of the signer is very important. You have to zoom in as much as possible on the face. For the hand and body movements, you have two options:
- If you use Chromakey and you will later remove the background, then there can be no ‘cut-offs’. A ‘cut-off’ is a hand or arm, that goes outside the frame. Because the signer will be on top of other visuals, cut-offs will look as if hands or arms really are cut off. When you focus the camera, it is important to include all the ‘signing space’ in the frame. You have to instruct the signer not to make any movements or signs, outside the signing space.
- If you are not going to ‘key out’ the background and the video will be shown inside a videowindow or box, the camera can zoom in more. Cut-offs are not so bad, because it will be as if you see the signer through a window. Experienced signers can guess what they can’t see. Most experienced signers don’t even notice the cut-offs.
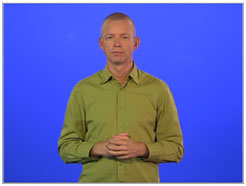
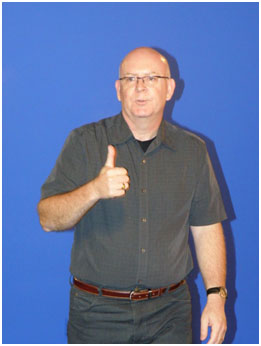
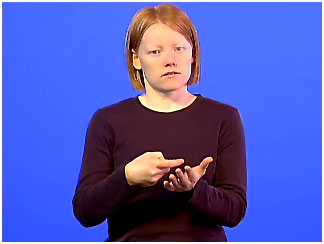
For Signs2Go, we used a frame from the top of the head, to the belt of the signer:
The signer should look into the lens. The camera should be about eye-level, so that the signer doesn’t have to look up, or down
Focus
Turn off automatic focus and automatic iris (if possible). Zoom in on the face of the signer and manually adjust focus and iris.
Clothing
Don't use clothes with stripes or patterns – choose plain clothes with one colour. If the colour is too bright you may experience problems with shadows from the hands of the signer. If you are going to use Chromakey you must not use the same colour on the clothes as on the background (blue or green). Neutral colours are best.
There must be a good contrast with the skin-colour. If you use a Chromakey background, you cannot use colours that resemble the colour of the background.
Glasses may reflect the lights. Jewelery, especially rings and watches, may reflect the lights too and may be distracting.
Make-up
The studio lights are very bright. This can make the signer look very pale. You can use make-up to give the signer a more natural colour. Sometimes you also have to use make-up on the hands.
Cueing the signer
We used different methods, to cue the signer:
1. Autocue
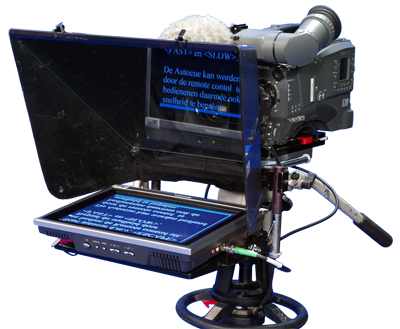
The script is written in glosses. The glosses are projected on the autocue. The signer can read the glosses, while maintaining eye-contact with the camera.
2. A shadow signer
A shadow signer is someone standing next to the camera. The shadow signer can sign the script, and/or monitor the signer. The shadow signer can use a script (in glosses), or a video.
When you use a shadow signer, it is important that the signer has eye-contact with the camera, not with the shadow signer!
3. Video
The signer can use a video, to cue him/her. When you use a video to cue the signer, it is important that the signer has eye-contact with the camera, not with the video screen!
Filming
Recording on tape:
Record the background image for 30 seconds on a new cassette. When recording a sign sequence, press the record button and wait three seconds before the actor starts signing. The actor should be looking at the camera lens with hands down in these three seconds. After the actor has finished signing, make her/him keep looking at the camera lens for three seconds and let the camera roll for ten seconds. This will make the editing easier, and will make it easy to add new recordings to the tape without loosing the time code. (If you have "black spots" (without recordings) on the tape, the time code will start on 00:00:00:00 and this would make the editing more complicated.)
Recording on hard disk or memory cards:
This is more practical than using tape as you don’t need to digitize or transfer the tapes to the PC for editing. Even with a DV camera you can make the recordings directly to PC with a Firewire cable and a PC program (Adobe OnLocation is fine).
For every session make a recording of the background without the signer for 10 seconds. This clip can be useful for making a better Chromakey.
When recording a sign sequence, press the record button and wait three seconds before the actor starts signing. The actor should be looking at the camera lens with hands down in these three seconds. After the actor has finished signing, make her/him keep looking at the camera lens for three seconds before you stop the recording.
Editing
For basic editing, we used: VirtualDub: http://www.virtualdub.org/